Collecting debug information - USS Agent for Windows
If you have been asked to collect debug information regarding a version of the USS Agent for Windows, please follow these steps.
Collect environmental information
Please provide your service provider with as much of the following as possible:
- Version of the USS Agent installed - find this by right-clicking the tray icon and selecting About.
- The Microsoft Windows operating system version - find this in Control Panel / System
- Whether the operating system is 32-bit or 64-bit - find this in Control Panel / System
- The names of any Internet security software installed, particularly anti-malware software, and the version numbers. Find this in Control Panel / Programs and Features list.
- Where possible, the steps to re-create the issue
Automatically collect debug logs
The log files written out by the USS Agent are extremely helpful in understanding any problem. By default, standard debug level is enabled but you should change this to Extra Logging. To do this, right-click on the tray icon and then select Enable Extra Logging.

Once you've have recreated the original problem, click the Collect debug data option.

View Agent Status
you can easily view agent status to quickly diagnose issues with the agent, very useful alongside the Tray Icon Status Codes guide

Manually collecting a WFP diagnostic file Open an elevated command prompt
- Type
netsh wfp capture start - Re-create the problem, for example slow browsing or crash
- Type
netsh wfp capture stop - Zip up the resulting
.cabfile and email it to your Service Provider
Manually collecting a process dump
For more complex issues, it may be necessary to collect a Process Dump to allow deeper investigation into the problem.
If the problem resulted in a Blue Screen (BSOD) then the dump file should be located in:
%SystemRoot%\MEMORY.DMP
If there is no file here, or the crash results in the process itself stopping or hanging, follow these steps:
ProcDump command line tool.- Re-create the problem
- Press
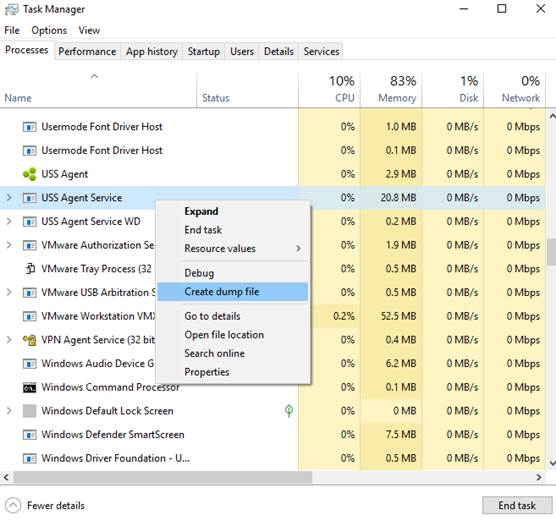
Ctrl+Alt+Delto start the Task Manager - Click the Processes tab and order by Name
- Find the
USS Agent Serviceprocess. - Right-click and select Create dump file

- Wait a few moments whilst the process dump file is written out.
- Repeat the steps for all processes with the same name in the list.
- Zip up all of the resulting
.dmpfiles and send them to your service provider.
Manually collect an Installation log
If you have experienced problems installing the agent then collect the installation log file and forward it to your service provider. The log can be created by running the installer file through msiexec, for example:
msiexec /i Setup64-4.x.x.xxxx.msi /L*V! uss_install.log
The file uss_install.log will be created in the current directory.