Configuration options for the USS Gateway agent - Console
 Updated 3 hours ago
by
admin
Updated 3 hours ago
by
admin
The Agent Configuration page lets you create or modify agent profiles for Gateway agents.
In the console, go to Browse ⟶ Agent Configuration and open the Gateway tab. Click the settings (cog) icon next to a profile to open it. The profile editor has a menu on the left with Settings, TLS Inspection, Bypass Categories, Gateway Anti-Malware, Captive / Guest Portal and Advanced sections. When you have made your changes, click Apply Changes at the top right (or Discard Changes to undo them).
Settings
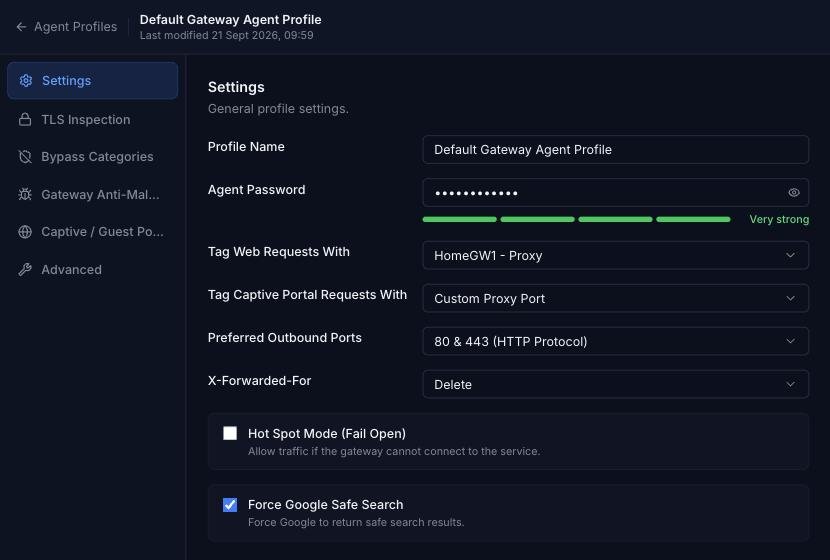
Profile Name
A friendly name for the profile to make it easier to manage.
Agent Password
This password secures access to the Web UI on the gateway server. This password is automatically generated when the profile is created but can be changed.
Tag Web Requests With
The Tag to assign to this agent. Tags are used to identify the agent in the Rule Builder. Select a tag to use, or choose None if a tag is not required. Tags are managed in Browse ⟶ Module Settings ⟶ Tags.
Tag Captive Portal Requests With
The Tag to assign to traffic when the gateway is used as a transparent proxy e.g. with Captive or Guest portal. Tags are used to identify the traffic in the Rule Builder. Select a tag to use, or None if a tag is not required.
Preferred Outbound Ports
The agent will connect to the Browse service on ports 1344 & 1345 or 80 & 443. Select the preferred ports here and they will be tried first. If a connection is not established, the agent will try the remaining ports.
Hot Spot Mode (Fail Open)
If enabled, the gateway will provide unfiltered access if, for any reason the Browse service ports are inaccessible. If not enabled, web access will be blocked until the cloud service becomes available again.
X-Forwarded-For
Determines how the proxy will handle the X-Forwarded-For header. The default option is to remove it completely. The options are:
On | Proxy will append the client IP address in the HTTP requests it forwards. By default it looks like: X-Forwarded-For: 192.1.2.3 |
Off | Proxy will change the header to appear as X-Forwarded-For: unknown |
Transparent | Proxy will not alter the X-Forwarded-For header in any way |
Delete | Proxy will delete the entire X-Forwarded-For header. This is the recommended default |
Truncate | Proxy will remove all existing X-Forwarded-For entries, and place the client IP as the sole entry |
Force Google Safe Search
If enabled, the gateway forces Google to return safe search results.
TLS Inspection
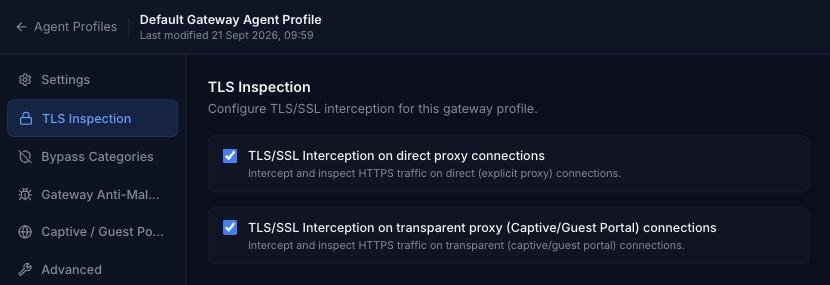
TLS/SSL Interception on direct proxy connections
Force TLS/SSL decryption and filtering on direct connections to the proxy on port 8080 e.g. via browser configuration or WPAD.
TLS/SSL Interception on transparent proxy (Captive/Guest Portal) connections
Force TLS/SSL decryption and filtering on transparently proxied connections e.g. Captive/Guest portal, WCCP, gateway mode.
Bypass Categories
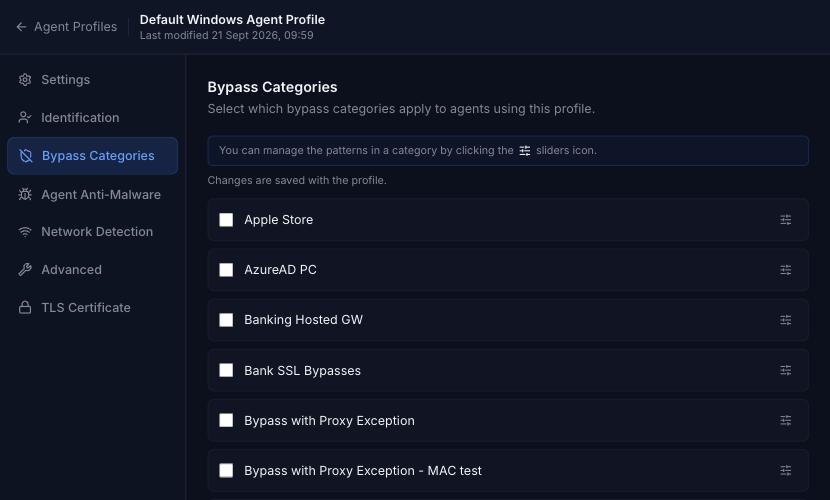
The Bypass Categories section contains a list of available categories, created in Browse ⟶ Categories ⟶ Bypass. Tick the categories to apply to this profile. You can manage the patterns in a category by clicking its sliders icon. Bypass categories provide a way for the gateway to trust particular network resources, so that matching traffic does not get filtered by the Browse service. A number of pre-defined categories are provided as a starting point for common services.
Captive / Guest Portal
Setting up Captive / Guest Portal
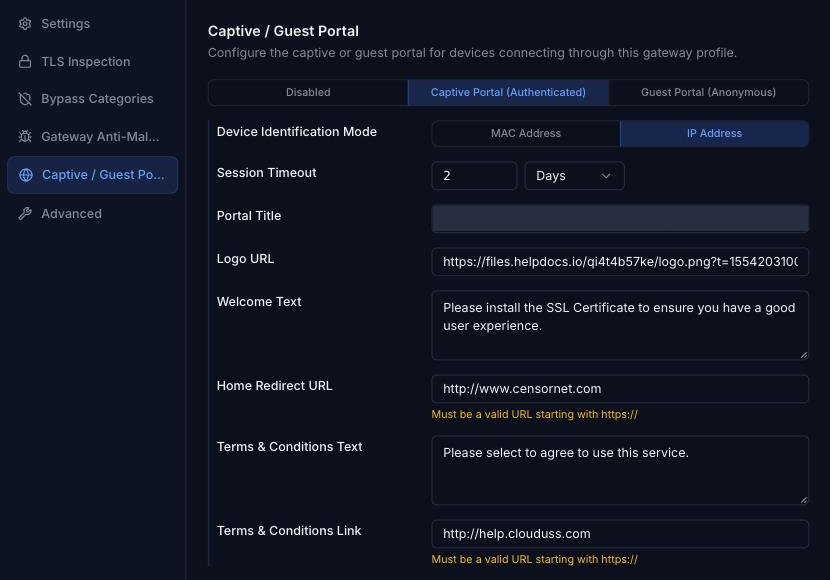
Open the Captive / Guest Portal section of the gateway profile and choose Disabled, Captive Portal (Authenticated) or Guest Portal (Anonymous). When a portal is selected, these settings are shown:
- Device Identification Mode: identify devices by MAC Address or IP Address.
- Session Timeout: how long a device stays signed in before it sees the portal again.
- Portal Title, Logo URL and Welcome Text: customise the portal page.
- Home Redirect URL: where the user is sent after accepting (must start with
https://). - Terms & Conditions Text and Terms & Conditions Link (the link must start with
https://).
The Captive and Guest Portals provide an easy way to handle Bring Your Own Device (BYOD) and Guest (Anonymous) browsing and form an important part of deployment.
In a BYOD scenario, the device (smartphone, tablet, laptop, etc) is owned by the employee and as such the IT department typically has no control over the configuration, nor do they want to get involved in changing it. In a Guest scenario, such as public Internet access area, the device is not owned by the company operating the network, the user of the device does not have any credentials and the IT department has no control over the configuration of the device. The Captive or Guest Portal provides a zero-configuration method to allow the device to join the network and browse the web securely, whilst still enforcing the correct policy for the staff member or generic policy for guest users.
How It Works
The Gateway server can be deployed in a Layer 3 transparent mode. The client devices need to have their default gateway set to the IP address of the Gateway server. When the client device makes an HTTP(s) request, the Gateway will intercept that request and display either a Captive Portal page or a Guest Portal page.
The Captive Portal page allows the user to authenticate against the configured Active Directory environment so that the administrator can apply user-based filtering and capture the username within the analytics reports.
The Guest Portal page is designed for public or anonymous access, where the user can accept the Terms of Service before being allowed to connect to the Internet via HTTP(s).
Once the client device has been accepted through either the Captive or Guest Portal, the request will be processed by the Gateway based on the policy configured in the Rule Builder.
There are two types of portal available: Captive and Guest.
Captive Portal
The Captive Portal present a login page which requires a valid Active Directory username and password to proceed.
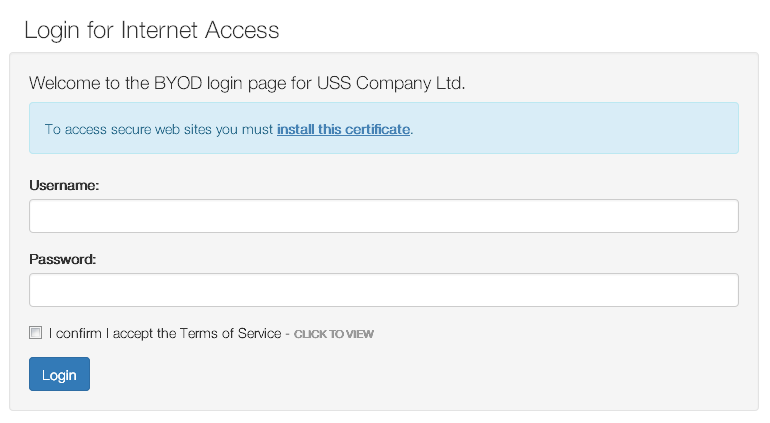
The logo, title, welcome text, acceptance checkbox and terms of service link can all be customised.
Guest Portal
The Guest Portal presents a splash screen which requires acceptance in order to proceed. No authentication is required.
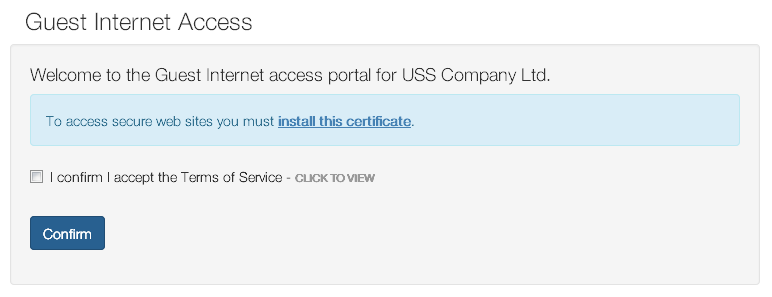
The title, logo, welcome text and terms and conditions can all be customised.
Deploying a Captive or Guest Portal
- In the gateway profile's Captive / Guest Portal section, choose Captive Portal (Authenticated) or Guest Portal (Anonymous), fill in the settings and click Apply Changes.
- Decide whether you require TLS/SSL interception for the Captive/Guest Portal (in the TLS Inspection section).
- Modify your DHCP server to issue the IP address of any of the configured network interfaces as the default gateway for the BYOD device.
- Re-join the BYOD device to the network so that it obtains a new DHCP lease and the correct default gateway.
- If SSL/TLS Intercept is enabled for the Captive/Guest Portal, install the SSL Certificate by clicking on the "install this certificate" link on the Captive / Guest portal page or by distributing the certificate via MDM to client devices.
- It is possible to selectively bypass SSL/TLS Interception for source IP addresses (devices) and destination domains
- It is possible to have SSL/TLS Interception on for direct proxy connections and off for Captive/Guest Portal
- If SSL/TLS Intercept is disabled for the Captive/Guest Portal, it is essential that the device is disconnected and reconnected to the WiFi network after changing its gateway IP address. HTTPS sites will not work until a session is established via step 4 above.
Gateway Anti-Malware
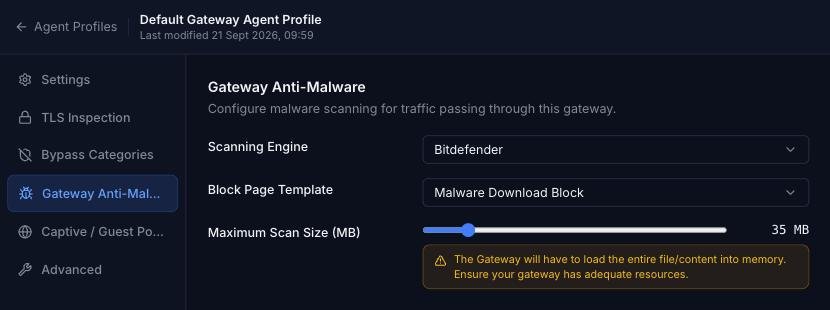
Scanning Engine
Select the scanning engine to enable Gateway Anti-Malware on gateways using this profile.
Block Page Template
Select the block page template to show if malware is detected. Templates are managed in Browse ⟶ Module Settings ⟶ Templates.
Maximum Scan Size (MB)
The maximum file size that will be scanned for malware.
Advanced
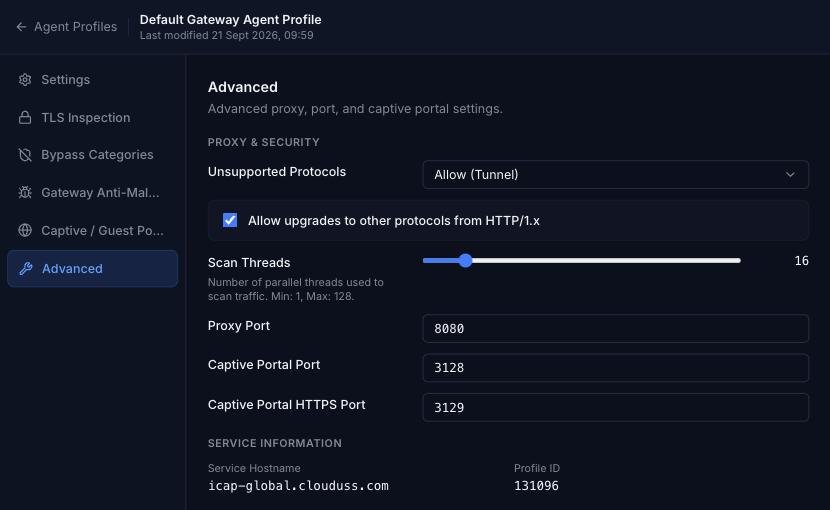
The Advanced section is split into Proxy & Security and Service Information groups.
Unsupported Protocols
This determines what the proxy should do if it encounters a non HTTP/S protocol. The default is to Deny, as any other protocols cannot be filtered and may pose a security risk.
Allow upgrades to other protocols from HTTP/1.x
This determines whether the proxy will respect the HTTP Upgrade header, which is used by Web Sockets and HTTP 2.0 (see Wikipedia for more detail). The default is to deny the upgrade request as this could be used by any proprietary protocol which may lead to unacceptable risk. If you require Web Socket support then this option must be enabled.
If you intend to use Firefox 71+ with Web Sockets, please pay attention to this open and active bug.
Scan Threads
The number of parallel threads used to scan traffic, from 1 to 128.
Proxy Port
This allows you to change the default proxy listening port from 8080 to another port you require.
Captive Portal Port
This allows you to change the default Captive Portal listening port from 3128 to another port you require.
Captive Portal HTTPS Port
This allows you to change the default Captive Portal HTTPS listening port from 3129 to another port you require.
Service Hostname and Profile ID
Shown under Service Information. The service hostname is determined by the region chosen for the Browse service. The Profile ID may be requested by your service provider during troubleshooting. Neither can be changed.